Overview
A Map is a User Item that adds a map to a Custom Page. You control the map size, center point, zoom level, and map type, and you can place multiple maps on a single page.Note 1
You add content to the map two different ways:
- You can use Second Site's built-in Map Editor to add markers and other shapes to the map.
- You can add markers to the map based on your genealogy data; each Map User Item may have one or more Map Events subitems to specify which events you want to include on a particular map.
Every map may include content created either or both ways.
Maps are created by scripts that Second Site adds to the page. Those scripts use other scripts that are provided by mapping services such as Google Maps. As a result, maps will not be visible unless JavaScript is enabled in the browser. Also, the scripts depend on content that is loaded from other servers, so the person browsing the page with the map must have an active connection to the Internet or the map will not be visible.
If you publish a site on removable media, and that site includes maps, you should include instructions that the maps will only work from a PC with an active Internet connection.
You can see an example map on the Second Site demonstration site.
You may adjust the formatting of the map using stylesheet parameters in the Stylesheets.System.Maps section.
Map Editor
You can use the Map Editor to add the following types of map content, called map items, to a map:
- Markers
- Multiple-point lines (polylines)
- Multiple-point shapes (polygons)
The shapes can be either filled or unfilled. When filled, the fill is semi-transparent to allow the map content beneath the shape to show through.
The Second Site Map Editor always uses the Google Maps service. The map Second Site creates for your site will use the Mapping Service you choose.
See Map Editor Details for more information.
Map Events
To add markers to the map based on events in your TMG project, you add Map Events via the [Add...] button on the Edit Map window. The Add button adds a Map Events subitem to the Map User Item that appears in the Map Events list on the right-hand side of the Edit Map window. Each Map Events subitem specifies a set of events, and the locations from those events are used to create markers on the map.
Second Site only processes events that have a LatLong value assigned in the place record.
If Place Format is set to "Use Place Style", which is the default, TMG places on the map will be formatted using the assigned Place Style. When set to "Use Place SubFields", TMG places will be formatted by concatenating the place subfields together separated by ", " (comma-space). When set to "Use Short Place", TMG places will be formatted using the Short Place value (if it is not blank) or the Short Place template.
See the Map Events Details section below for a more complete description of Map Events.
Formatting
On the Custom Page, the map is enclosed by a DIV element that by default includes a border that also surrounds the map title. The specific style parameters may be adjusted via the Stylesheets.System.Maps.Container section.
You can use the Map Alignment property to control how the map is aligned relative to the other Custom Page content.
Map Properties
Enabled
See Enabled on the User Items page.
Title and Show Title
Maps must have a Title, but the Title may or may not appear on the page. If Show Title is checked, which is the default, the title text appears above the map.
Caption
Captions are optional. If you enter a caption, it appears below the map.
Width
The Width property determines the width of the map on the output page. You must specify a width.
Height
The height property determines the height of the map on the output page. You must specify a height.
Map Alignment
The Map Alignment property determines how the map enclosure is positioned relative to other content on the page. The map enclosure includes the map title, the map item list, the map itself, and the map caption, if any. You can float the map enclosure left or right, or you may center it. When the map enclosure floats left or right, other content may flow to the other side of the enclosure.
Clear
See Clear on the User Items page.
Mapping Service
The Mapping Service pull-down menu determines which online mapping service will be used to create the map contents. At this time, Second Site supports Google Maps and Bing Maps.
Note Mapping services do not support all browsers. Firefox, Google Chrome, and Internet Explorer are widely supported. Support for other browsers varies.
Some mapping services require API Keys to publish pages that use their mapping services. Some services have different names for the API Key such as Application ID. As of this writing, the API Keys for the mapping services supported by Second Site are all free.
You must acquire an API Key for any mapping service you use that requires one. After acquiring the key, copy and paste the key into the appropriate text property in the Site section of Second Site.
| Service | API Key Requirement |
|---|---|
| Google Maps | As of this writing, Google Maps requires an API Key. If you acquire a Google API key and add it to your SDF file in the Site.Google API key property, SS will add the API and Google will provide you with usage statistics.
See Obtaining an API Key for instructions. If you want the map to work when you test the site locally, you must specify that the API key is not limited to a domain. |
| Bing | As of version 7 of the Bing Maps API, you must acquire an API Key. See: Getting a Bing Maps Key for instructions. |
In most cases, the mapping service sites will include links to "How to Get Started" pages after you signup for the API Key or Application ID. You do not need to read or understand any of that information to create maps with Second Site. All you need is the API Key or Application ID. Copy and paste that data into the appropriate property in the Site section and Second Site will take care of the rest.
Map Style
The Map Style pull-down menu determines the map style when the page containing the map is opened. The user can change the map style using controls provided for that purpose.
The default Map Style is "Road". That produces a map that shows roads, some political divisions like town names, state and country borders, and large physical features like rivers and lakes. The other map style options include Aerial, Hybrid, and Terrain. Aerial maps are based on high-altitude photography. Hybrid maps are a combination of Road map labels and roads superimposed on Aerial maps. Terrain maps show some Road map labels but also show grade variations and other physical characterstics.
Mapping services use different names for the same map styles. The table below indicates how choices in the Map Style pull-down menu relate to mapping service map styles.
| Map Style in Second Site |
Map Style in Google Maps |
Map Style in Bing |
|---|---|---|
| Road | Map | Road |
| Aerial | Satellite | Bird's Eye (no Labels) |
| Hybrid | Hybrid | Bird's Eye (with Labels) |
| Terrain | Terrain | <NA> |
When a Map Style is not available (NA) for a particular mapping service, Second Site uses the Road style instead.
Center Point
The Center Point property contains the geographic coordinates of the center point of the map. The person browsing the site may drag the map or use other means to change the location. You may set the value by entering a latitude, longitude value in decimal degrees notation. (See Entering Coordinates, below.) The Center Point is updated when you use the Map Editor and save the changes: the coordinates of the map center at the time you close the Map Editor are used to update the Center Point property.
Zoom Level
The Zoom Level slider controls the initial zoom level of the map. The person browsing the site may adjust the zoom level by manipulating the map zoom control. You may set the value by adjusting the slider. The Zoom Level is also updated when you use the Map Editor and save the changes: the current zoom level at the time you close the Map Editor are used to update the Zoom Level property.
If you change the zoom level of the map while using the Map Editor, but you want to retain the original center point and zoom level when you save the map, you can use the "Return to last result" map control as described above in the Center Point section.
Item List Position
The Item List Position pull-down menu controls whether an item list is included with the map, and if so, where it appears. The choices are "None", "Left", and "Right". The default value is "None".
If you choose "Left" or "Right", the title of each item on the map will be added to a clickable list that will appear in a list on the left or right of the map. If you choose "Left" or "Right", make sure your map is not wider than the space available in your layout.
The Second Site demonstration site includes an example map where the list of items is visible on the left.
Map Editor Details
Note You must be connected to the Internet to use the Map Editor.
To open the Map Editor, open the Map User Item and then click the [Edit] button. Second Site will display the map in your default browser using a special page that includes map editing buttons. It may take a few moments for the map to appear: various files must be downloaded from the Internet to render the map and prepare the editing environment.
The Map Editor uses the Google Maps API even if you select another mapping service to render the map in the final site. If the final map will be rendered by a different mapping service, you should build the site at least once and adjust the zoom and other map parameters based on the end result rather than rely solely on how the map looks in the Map Editor.
To draw on the map, click on one of the editor buttons in the top center of the map and then click on the map.

- The hand tool moves the map and clicking it will turn off any of the other three.
- The balloon tool creates a marker
- The polygon tool creates a multi-sided shape
- The line tool creates a multi-segment line
Markers are created with a single click. To edit the name of a marker, and other properties, double-click the marker to open the map item dialog.
Lines and polygons require multiple clicks to define the ending point of each segment. Double-click to stop drawing a line or polygon. For polygons, the last point will automatically be connected to the first point.
To edit an existing item and change its name, line width, color, etc., double-click on the item or double-click on the name of the item in the list of items.
To change the sequence of the items in the list, click on the up/down icon and while holding the mouse button down, drag the item to the position you want then release the mouse button.
To edit a line or polygon, click it to select it, then drag the points. While editing the shape, click on a point to delete it. You can click on the "ghost points" to add a point between two existing points. The ghost points lie halfway between the existing points.
To add a vertex to either end of a line, move the last vertex to the new desired end point. Then click on the ghost handle that is between the last two vertexes and drag it to where the old end used to be. That will create a new vertex there. The result is the addition of a new point on the end, but done by adding one in the middle. This method is necessary because there is no ghost handle you can use to create a point beyond the current end point.
To add a line that connects markers, you have to overcome the problem that clicking the mouse near a marker will select the marker and that interferes with drawing a line. The solution is to click near the desired location and then go back and drag the vertex to the desired location. To begin, click on the polyline tool, and then click near (but not on) the first marker. The Map Editor will create the first vertex and show a "rubberband line" and the "+" cursor for making the next vertex. Continue in that fashion until you have all the line segments you want: click near but not on the markers. After double-clicking to end the addition of new vertexes, move the mouse over the first vertex in the line. Click and drag the vertex handle over the marker. Repeat that for the other points on the line. When moving the line vertexes, you'll probably want to be fully zoomed in so that the line vertexes are very, very close to the points they share with the markers.
To close the Map Editor, click the [OK] button or the [Cancel] button. The [OK] button will close the browser tab, if possible, and copy the item definitions to the clipboard. The [Cancel] button will close the window and discard any changes.
If you want to save the changes you made, there is one more step required. Switch back to Second Site if it is not the top-most application and click the [Import from Editor] button. Second Site will read the item details from the clipboard and store them in the User Item definition.
Map Events Details
Each Map Events item includes a series of properties.
Icon
Click the [Set Icon] button to select the icon you want to assign to the event locations. Click the [Standard] button to use the default icon determined by the mapping service. The other icons are colored and/or numbered icons based on the Google Maps icon style.
If you choose an icon with a number, all the locations will be assigned that icon. If you click the [Numbered] button, Second Site will assign icon "1" to the first place, icon "2" to the second, etc.
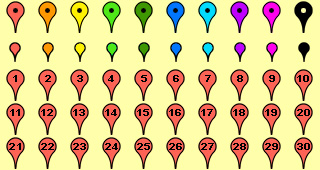
To match icons to other graphic elements, it may help to know the exact colors of the markers. None of the markers are a single solid color, but the following colors are close.
| Color Name | Color Value |
|---|---|
| red | #FD645C |
| orange | #FF9109 |
| yellow | #FEF500 |
| green | #4DEB1C |
| dark green | #3F9405 |
| Color Name | Color Value |
|---|---|
| blue | #0677FB |
| light blue | #01DBF6 |
| purple | #B705F9 |
| pink | #FF00EF |
| black | #000000 |
Show Coordinates
If Show Coordinates is checked, the information box for the location will include the latitude and longitude coordinates. The default value is checked.
Show Place Comment
If Show Place Comment is checked, the information box for the location will include the Comment field from the TMG Place Record. The default value is unchecked.
Event Filters
For each Map Event item, you specify one or more filters to select a subset of TMG events:
- by Event Type (Birth, Death, Burial, etc.)
- by Event Primary status
- by Person (by a custom flag value)
- by Location (filtering based on city name, state name, etc.)
The filters are applied in the following sequence:
- As described above, the location must have a LatLong value assigned. Second Site does not geocode locations for various reasons.
- Location filter: Second Site applies the location filter, if any, and ignores locations that do not pass the filter.
- Event Type filter: Second Site checks the Event Type of each event that took place at the given location. If you choose an Event Type from the Map Event item's Event Type pull-down menu, then the event must have the same Event Type. If you do not choose an Event Type, then the event must have an Event Type that is selected in the Database.Tags list of events.
- Event Primary filter: If Primary Only is checked, the event must be primary for both principals or the event will not be processed.
- Living filter: The event is subject to the People Section Detail Filters, so events for living people may be suppressed.
- Included/Excluded filter: One of the event principals must be included on the site or the event is ignored.
- Flag filter: Second Site applies the flag filter, if any, and ignores events if neither principal passes the flag filter. Only one principal must pass the filter, not both.
Place Filter Values
In the Value fields in the Place Filter section, you can enter multiple values separated by two vertical bars. So, for example, to test for multiple States:
- Set Place Subfield to:
L5 - State - Set Operator to:
Equals - Set Value to:
Iowa||Ohio||Utah
With the Operator set to "Equals", as shown above, any one of the three states is a valid entry for the State field. Second Site constructs the logical filter as follows:
State = "Iowa" OR State = "Ohio" OR State = "Utah"
If you change the Operator to "Does Not Equal", then any one of the three states is an invalid entry and all other states are valid. Second Site constructs the logical filter as follows:
State != "Iowa" AND State != "Ohio" AND State != "Utah"
("!=" is a two-character symbol used to mean "not equal".)
Show Label
If Show Label is checked, the event label will be included in the marker text. The marker text always includes the date (if any) and the principal names.
Connecting Markers with Lines
You can connect the events defined by a Map Events entry using the Add Line checkbox. When checked, Second Site will add a Polyline that connects the markers. You can choose the line color and line width using the associated controls.
Coordinates
Entering Coordinates
For places that you specify when you define a map in Second Site, such as the initial center point of the map, you enter coordinates using decimal degrees notation. In decimal degrees notation, both the latitude and longitude are expressed as decimal numbers with fractions of a degree after the decimal point. Positive numbers for latitude are north of the equator, and negative numbers are south. Positive numbers for longitude are east of the Prime Meridian, negative numbers are west.
For example, here is the latitude and longitude of the pitcher's mound at Fenway Park in Boston, Massachusetts: 42.346351,-71.097615. (Map)
Decimal degrees notation is used by most GPS devices and by all the major online mapping services.
Latitude and longitude can be entered in your TMG data in the LatLong subfield of the Place Record. TMG v8+ uses decimal degrees notation to store the coordinates value. For TMG v7 and previous, see the section below.
Latitudes in the southern hemisphere begin with a minus sign. To avoid confusion with TMG's single-exclusion marker, you can escape the leading minus sign in the coordinates. So, for example, coordinates for Lima, Peru should be entered as \-12.092115,-77.046604 (Map).
Decimal Degrees Notation in TMG v7 and Previous
In TMG v7 and previous, TMG uses a special format for latitude and longitude. You can read about that TMG format in the TMG v7 help system. If you can enter decimal degrees notation in TMG v7's LatLong field, TMG will convert that format into its internal format. TMG v7's internal format is not as precise as the decimal degrees notation, so some accuracy is lost during the conversion. For example, if you enter the pitcher's mound location (42.346351,-71.097615), the converted coordinates will equate to 42.346111,-71.0975 (Map), a spot near the Red Sox dugout, not the pitcher's mound.
For that reason, Second Site recognizes an alternate format for entering decimal degrees notation in TMG v7. Use a tilde ("~") in place of a comma, i.e, 42.346351~-71.097615 rather than 42.346351,-71.097615. TMG v7 will not convert that format to its internal format, but Second Site will recognize the value as decimal degrees notation.
Determining Coordinates
If you have a handheld GPS device, you can find the coordinates of any place you can visit, and you probably already know how to do so. Some automobile direction systems will display the coordinates of the current location, although some make the coordinates more prominent than others.
If you do not have a GPS device, or you are unable to visit the desired location, you can use various online web sites to determine the coordinates. Some of those sites are listed below. Some of the sites are applications built on one of the major mapping services. Some services have better maps than others for certain areas.
- Google Maps – Easy to use to find the location of interest, but requires a little trick to get the coordinates. (See the Determining Coordinates using Google instructions below.)
- iTouchMap – Somewhat difficult to use because it adds markers everytime to click the map, even when you are still trying to move the map to the area of interest.
The Second Site Map Editor shows the coordinates of the center point of the map beneath the map. That may be helpful, but it does not include a crosshair or other graphic device to indicate where the center is, so it is not useful for precise work.
Determining Coordinates using Google
Follow these steps to extract the coordinates of a location using the main Google Maps site.
- Enter an address and let Google search for it. If Google Maps does not know the specific location, enter the location of a place nearby.
- Drag the map, and zoom in as close as possible until you can see the location of interest.
- Right-click on the exact spot and choose "What's here?" from the pop-up menu.
- The Search box near the top of the page will change to the latitude and logitude. Also, a green marker will be added to the map, and you can click the marker to show the coordimates. Unfortunately, sometimes the green marker is obscured by another marker showing the street address and other information.
Notes
- You may include multiple maps on a Custom Page. It's possible to include maps from different mapping services on the same page, but that is not recommended.